 VectorExpert
Home · Workflow · Stage 2 of 6
Up to five layers on every section, with toe points worked out for you.
Ground plus up to four layers, each from a surveyed field book or a design template. Every layer slopes out to the layer you choose, the toe is found where they meet, and cut and fill are calculated for every chainage.
Try it
Generate sections, on a real chainage
CH 0+030 of the CSE_Sample1 canal project that installs with the trial, using the same calculation as CivilSurvey Expert.
In CivilSurvey Expert
How it works
In the app, step by step
- 01
Add routes
Create a field book route for each surveyed layer, or a design route for a template-based one.
F2 New Route - 02
Assign layers
In the Route Editor, give each route its series: NSL, or Series 2 to 5. One route per series, all or nothing on save.
Ctrl+E Route Editor - 03
Draw the template
In the Template Designer draw the typical section with Line, Set Center, Mirror and Snap. Define each segment by length and gradient (or 1 in N), height or horizontal distance. Or import it from an AutoCAD drawing.
Ctrl+D .cst · import .dwg - 04
Place it along the route
Pick a chainage range and set levels by constant height above ground, by gradient (%, 1 in N, or start and end R.L.), or by a fixed level.
Template Position - 05
Set slopes and targets
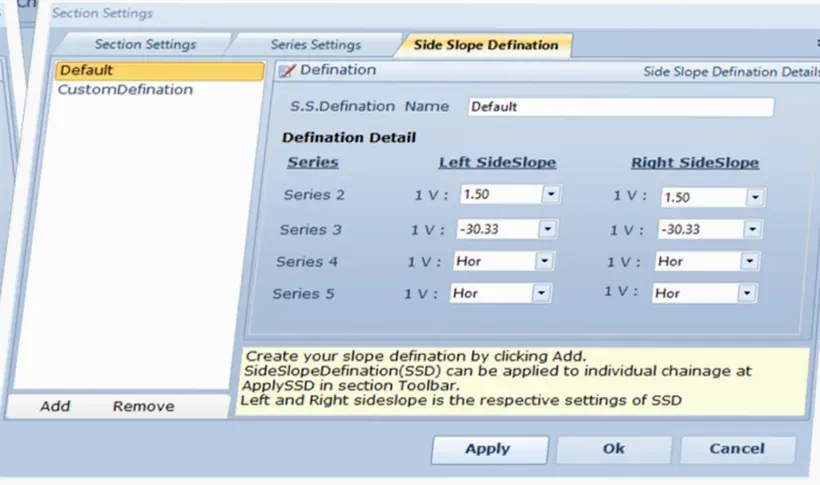
For each layer choose the layer it extends to and its default slope set. Slope sets hold left and right slopes as 1 V : x H, and 0 means vertical.
F8 Section Settings - 06
Open the sections
Open cross or long sections, rebuilt from the routes or loaded from saved edits. Step, jump or animate through the route, then Run All to store every area and toe.
F6 F7 Run All
Details
Everything in this stage
| Feature | What it does | Detail |
|---|---|---|
| Layers | ||
| Series | Ground plus up to four layers, each with alias, layer, colour and line type | NSL + SERIES 2–5 |
| Route types | Field book (surveyed points) or design (template at a level on each chainage) | Field Book · Design |
| Design sheet | Live formulas for height and gradient; cut heights in red; template and apply chosen from lists | Chainage · Centre Level · Template · Height · Level at Template Centre · Gradient % · Apply |
| Geometry | ||
| Toe derivation | Each side slope is projected from the layer's outer point until it meets its target layer, going up for cut or down for fill. If they don't meet, the apparent intersection with the target's end segment is used. | Left and right, per layer |
| Slope sets | Named side-slope definitions, applied to any single chainage from the section screen | 1 V : x H · 0 = vertical |
| Area | Between each layer and its target, toe to toe, split into cut and fill where they cross, by trapezoidal strips | m² cut · fill · net |
| Drawing | ||
| Scales | Separate scales for cross and long sections | CS 1:100 × 1:100 · LS 1:1000 × 1:100 default |
| Datum band | Level and offset rows per layer, chainage, scale, intersections, level reference bar | Show or hide each |
| Lettering and lines | Bundled CAD fonts, table row height and font, line weights and precision | 24 fonts · 0.00–2.11 mm · 0–3 decimals |
| Reuse a standard | Copy section, layer and slope settings from any earlier project | Tools › Import Settings |
| Moving around | ||
| Navigator | First, previous, next, last, or type a chainage; the readout shows position and range | ← → PgUp PgDn Home End Ctrl+G |
| Animate | Steps through every section on its own | 1–10 s per section |
| Long section | Centre-line level of every layer along all chainages | F7 |
On screen
What you'll see
Common questions
How many layers can a section have?
Five: the natural surface (NSL) and four more, such as banks, bed cut, earth top or bitumen.
Can I reuse a template from an old AutoCAD drawing?
Yes. The Template Designer imports a .dwg and converts it into a template you can save as a .cst file and place on any project.
Can the side slope change partway along the route?
Yes. Keep several named slope sets and apply a different one to any chainage from the section screen.
Do I need AutoCAD to view or print sections?
No. Sections are drawn in CivilSurvey Expert's built-in CAD. Export DWG only when someone else needs the drawings.